CumuLogic Getting Started Guide (Falcon)
Terminology
CumuLogic Image – The base CentOS 6.x image created to meet all the prerequisites defined in the image section.
Target Cloud – Refers to one or more Infrastructure-as-a-Service clouds (IaaS) such as Amazon EC2, Citrix CloudPlatform, VMware vCloud, HP Cloud or any other OpenStack- or CloudStack-powered clouds.
Services – Application infrastructure services such as relational and NoSQL databases.
Email Templates – Templates for emails sent out by the CumuLogic platform that you can customize based on your requirements.
VM Pool – A dedicated resource pool of pre-provisioned virtual machines, which can be used in the absence of one of the supported IaaS clouds to provision services and deploy applications.
Subscriptions – Pre-packaged service bundles created for your users to deploy specific services in just a few clicks without having to go through all selection options.
CumuLogic Appliance Installation
The CumuLogic DBaaS Platform Controller is delivered as an appliance on Amazon EC2, or can be downloaded as appliance image for your private clouds. You will receive download instructions once you request the appliance image from our website.
Requirements
- Hardware - Recommended hardware requirement for the controller is 4 CPU/8GB memory.
- OS - The appliance is running CentOS 6.5 (64bit).
- Storage – The controller itself doesn’t need a lot of storage space. To get started you can use the default 10GB root volume. However, you will need additional storage for the database backup, binary logs etc. See configure additional storage section under Advanced Configuration.
Follow the steps in the sections below according to your IaaS environment for installing and configuring your CumuLogic DBaaS Platform.
Running the CumuLogic DBaaS Appliance on Amazon EC2
You can launch the CumuLogic DBaaS appliance from the Amazon marketplace.
- Make sure to select an m3.large instance type as a minimum.
- Open port 80 (for UI access) and port 22 (for SSH access) during provisioning and create key pair for your access.
The appliance is pre-configured with an EC2 image, so you’ll need to add your EC2 credentials under the Target Cloud section and start deploying the database services.
You can choose to add your own base image. Follow the instructions under “Create Image” from the Platform Configuration section below.
Running Appliance on VMware Player or Oracle VirtualBox
Download and extract the VMDK appliance image file from the CumuLogic’s platform. You can use the VMDK file and create a new virtual machine in your VMware Player or Oracle VirtualBox. Refer to the specific steps according to your environment.
Recommended hardware requirement for the controller is 4 CPU / 8GB memory.
Start this virtual machine and proceed to Platform Configuration section for configuring the appliance.
Running Appliance on Private Clouds
The appliance image is available as VMDK format, raw, and qcow2 formats. Download the appropriate image for your cloud. Upload the image in your cloud and launch a VM using this image.
Recommended hardware requirement for the controller is 4 CPU/8GB memory.
Once you have the appliance up and running, proceed with the configuration.
Basic Configuration
Once the Controller virtual machine is up you need to update the configuration settings with the IP address of the controller. The appliance has a default user “cluser/cluser”. We recommened you change the password upon first login.
Login as “[email protected]” with password as “cumulogic” to the Admin Console at http://<host-name>/cl, where the host-name is the DNS name or the IP address of your Platform Controller Server. Your landing page is the Admin Dashboard. We recommend you change the password for admin user.
Under “Settings” menu, update the SMTP_PAAS_URL with IP address of your controller and save the setting.
Then login to the controller as “cluser” and restart the controller with, “sudo service cumulogic restart”.
Platform Configuration
After installing the CumuLogic DBaaS Platform, you need to configure the platform with your IaaS cloud before you can start provisioning the database services.
Login as “[email protected]” to the Admin Console at http://<host-name>/cl, where the host-name is the DNS name or the IP address of your Platform Controller Server. Your landing page is the Admin Dashboard. The dashboard provides access to configure and manage images, users, VM pool and subscriptions.
This section will describe:
- Creating the image (template)
- Adding the image to the platform
- Adding the target cloud
Creating the Image
CumuLogic Controller provisions the database services on the target IaaS cloud using the CumuLogic image template.
Create the image in your cloud and add it from the Admin Console by following the steps described below:
- Launch a VM instance with the latest CentOS 6.x or RHEL image template in your cloud. It is recommended a VM with a minimum of 10GB root volume.
- Run “yum update” to ensure that the image is updated.
- Install the following packages on the VM instance if they are not already installed:
- openssh-clients
- openssh-server
- openssl library {Example for CentOS 6.2: openssl098e.x86_64}
- java-1.7.0-openjdk
- libaio
- zip/unzip/bzip2/gzip
- perl
Example – run below command
# yum install –y openssh-clients.x86_64 openssh-server.x86_64 openssl098e.x86_64 java-1.7.0-openjdk.x86_64 libaio.x86_64 zip.x86_64 unzip.x86_64 bzip2.x86_64 gzip.x86_64 perl.x86_64 perl-Time-HiRes.x86_64 perl-Compress-Zlib.x86_64
- Disable iptables – service iptables stop and chkconfig iptables off
- Check and set umask to “022”
- Check /tmp sticky bit permissions, “chmod 1777 /tmp”
- Update file descriptor and process limit to 64000 by editing /etc/security/limits.conf and add below entries:
* soft nofile 64000
* hard nofile 64000
* hard nproc 64000
* soft nproc 64000
- Other recommended settings for ulimit are below. You check “ulimit –a” and verify these values:
- -f (file size): unlimited
- -t (cpu time): unlimited
- -v (virtual memory): unlimited
- -n (open files): 64000
- -m (memory size): unlimited
- -u (processes/threads): 64000
- CumuLogic Controller uses SSH to login to the VM to configure during provisioning and it will provision the VM with the SSH key.
If your IaaS cloud does not support SSH key creation at runtime, you will need to create a root SSH key and copy the id_rsa to /root/.ssh/authorized_keys in the image.
Don’t forget to save the id_rsa.pub file as xx.pem and remove it from the VM before taking the image. You will need to upload this xx.pem file while adding the Image to on the controller (Refer to ”Add Image” section below). This key will be used by the CumuLogic Controller to login to the instances created with this image.
- Reboot the VM instance and test logging in with the SSH key.
- Remove the /etc/udev/rules.d/70-persistent-net.rules (if it exists)
rm -f /etc/udev/rules.d/70-persistent-net.rules
- Cleanup the instance before taking a snapshot.
- Take a snapshot and create an image.
- Test the image by launching a VM with this image.
- Note that for this Image-ID you will need it to add image on the “Add Image” screen.
Adding the Image
To add the image details within the Admin Dashboard, click on “Images => Add Image”, such as ImageID, IaaS provider (from the dropdown menu), Target Cloud End point URI, Availability Zone/VDC information, and Instance Types/Flavors/Service-Offerings.

If your image has the built-in SSH key, you need to add the keypair (xx.pem). The SSH key is required for configuring and managing the VMs. If your IaaS cloud allows you to create the key at runtime, you can ignore this field. The CumuLogic Controller will create a keypair and use it during the provisioning of VMs.
Upon successful import, the CumuLogic Controller can now use this image for provisioning.
Target Cloud
Once you have added the image, the next step is to add valid IaaS cloud credentials to be able to provision the VMs/storage. You can add the target cloud by clicking on “Add Target Cloud” under My Account => Target Clouds screen.
This step is optional for the Admin. You can add a target cloud from the Admin Console and share it across multiple users, OR have individual users add their own target cloud credentials.
You can see the list of currently added target clouds as illustrated below. You can edit, delete, or assign the target cloud to the users.
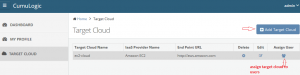
Administrators can assign the target cloud credentials to users. This is useful for private clouds where an admin can assign the same IaaS account to multiple users. If you want to assign the target cloud to additional users, you can click on the “Assign” action for the target cloud from the list, and then select the user from the list to assign/un-assign.
The target cloud assigned by Admin to each user will appear in the User Console. Users will see the target cloud in the target cloud dropdown on services launch screen.
Users can provide their own credentials to the target IaaS clouds in their accounts.
The credentials will vary depending on your IaaS cloud. Select your cloud type from the dropdown and provide appropriate credentials.
For some OpenStack implementations with keystone security like the HP Cloud, you will provide AccessKey, SecretKey, TenantID. For other implementations, you will need to provide username/Password/Tenant ID.
For Apache CloudStack and Citrix CloudPlatform, you need to provide AccessKey and SecretKey.
For EC2 you will provide Account Number, AccessKey, and SecretKey.
You can add more than one target clouds for the same IaaS environment, or you can also connect to different IaaS clouds from the same controller, as long as the controller has access to endpoint URIs. Refer to the checklist below.
Target Cloud Access Checklist
Follow this checklist to ensure that your cloud is functioning as expected with the CumuLogic DBaaS Platform:
- Confirm that the target cloud URI is accessible from CumuLogic’s platform controller. More specifically, confirm that there is no network isolation between the end point URI and the Controller. You can verify this by making an API call from the Controller to the target cloud.
- Check that you are able to launch a VM on the target cloud from the Controller using the APIs on the command line.
- Check that CumuLogic platform Controller has network access to the VM provisioned in the target cloud.
Advanced Configuration
This section will describe:
- Creating and managing user accounts
- Configuring additional storage on controller
- Configuring various global settings, such as notifications and support email addresses that the platform will use to notify you in case of failures, email notification templates, etc.
- Creating and using VM pools
- Creating subscription bundles
Managing Users
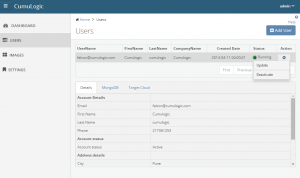
As Admin, you can manage user accounts from the User Management screen.
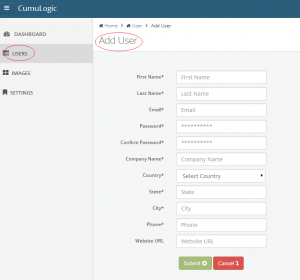
There is a default user “[email protected]” created with default password “cumulogic” for your convenience. You can change the password for this user from the Admin Console. You can now register additional users by clicking on “Add User” and follow the on-screen instructions.
You can activate/deactivate user’s accounts by clicking on the user name and select the appropriate action from the pop-up. You can also monitor the status of the services provisioned in the user accounts by selecting the particular service tab in the bottom pane.
Configuring Additional Storage
You will need to add additional storage to store database backup, binary logs, etc. How much storage space you need to add will depend on your environment. You can start off with 100-200GB.
There are multiple ways you can add storage to the controller:
1) Increase storage of root volume at the time of creating the controller from the appliance image.
2) If you are using EBS volume for additional storage, add EBS volume and mount it on controller as /opt/Backup_Storage.
3) If you are using external NFS storage – Mount the NFS volume as /opt/Backup_Storage.
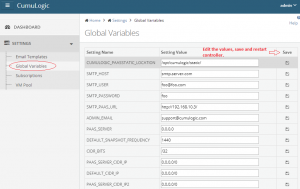
Once the storage is added, update BACKUP_STORAGE in Global Variables under the Admin Console settings and restart controller.
The option to store the backups to AWS S3-like object storage is coming soon.
Managing Global Settings
In the “Settings” screen menu in the Admin Console, you can customize and manage some of the global settings, email templates, subscriptions and VM pool.
Email Templates
Under Email Templates, you can edit the templates used for the emails sent out from the CumuLogic platform. The emails are completely customizable. Select a template from the dropdown menu, edit the subject/body of the email, and save.

Global Variables
Under Global Variables, you can configure global settings for the platform, such as admin email, default snapshot frequency, SMTP host and credentials. You can keep defaults for most of the variables, except you will need to provide valid SMTP host and credentials, as these are used to send emails from the Controller.
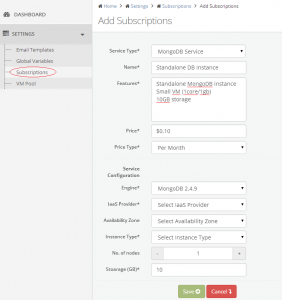
Subscriptions
Under “Subscription” you can create pre-packaged service bundles so your users can deploy specific services with a few clicks, without having to go through all available options. These are useful to reduce the number of configuration steps users need to take while provisioning services.
VM Pools
Under VM Pool, you can configure a dedicated resource pool of pre-provisioned virtual machines. This is particularly useful in the absence of one of the supported IaaS to provision services and deploy applications.
All the VMs in the pool should have same SSH key built into them. You will need to upload the key while adding the machines to the pool. The CumuLogic Controller will use this key while configuring the services on the VMs. Since the controller is going to use the VMs to configure services, the VMs should meet the base image criteria described in the Image section.
See below sample VMpool metadata json file. Create a file vmpool1.json with below content, substitute appropriate values for your vm nodes and add additional lines for number of VMs. You will need this file along with the ssh key to upload to add VMpool.
If your vmpool nodes don’t have public IP, you can use private IP value for all fields, as long as that private IP is reachable by the CumuLogic controller.
After adding the VM pools, the Admin can create a target cloud (under the “add target cloud” screen) with the available VM pool and assign the target cloud to users.
You can add more than one VM pool and assign the target clouds for each VM pool to multiple users.
Each VM pool is treated as a separate target cloud. You cannot span the target cloud or deployment across multiple VM pools.
Please refer to the User Guide at cumulogic.com/resources/documentation to start provisioning